
Screenshots are a necessity of every phone as they are helpful in fulfilling different purposes. Each phone device provides a built-in feature for taking a screenshot easily. However, the iPhone is taking the lead in providing screenshot features to its users along with many other features. One of the iPhone devices, “iPhone 7” provides a much-enhanced way to capture screenshots and deliver superb quality while sharing them.
How do I Take a Screenshot on My iPhone 7 / 7 Plus
To “take a screenshot on iPhone 7”, we will utilize the two methods which are mentioned below:
- Using Home and Power Button Combined to Take a Screenshot
- Using Assistive Touch to take a Screenshot
Method 1: Using the Power and Home Button Combined to Take Screenshot
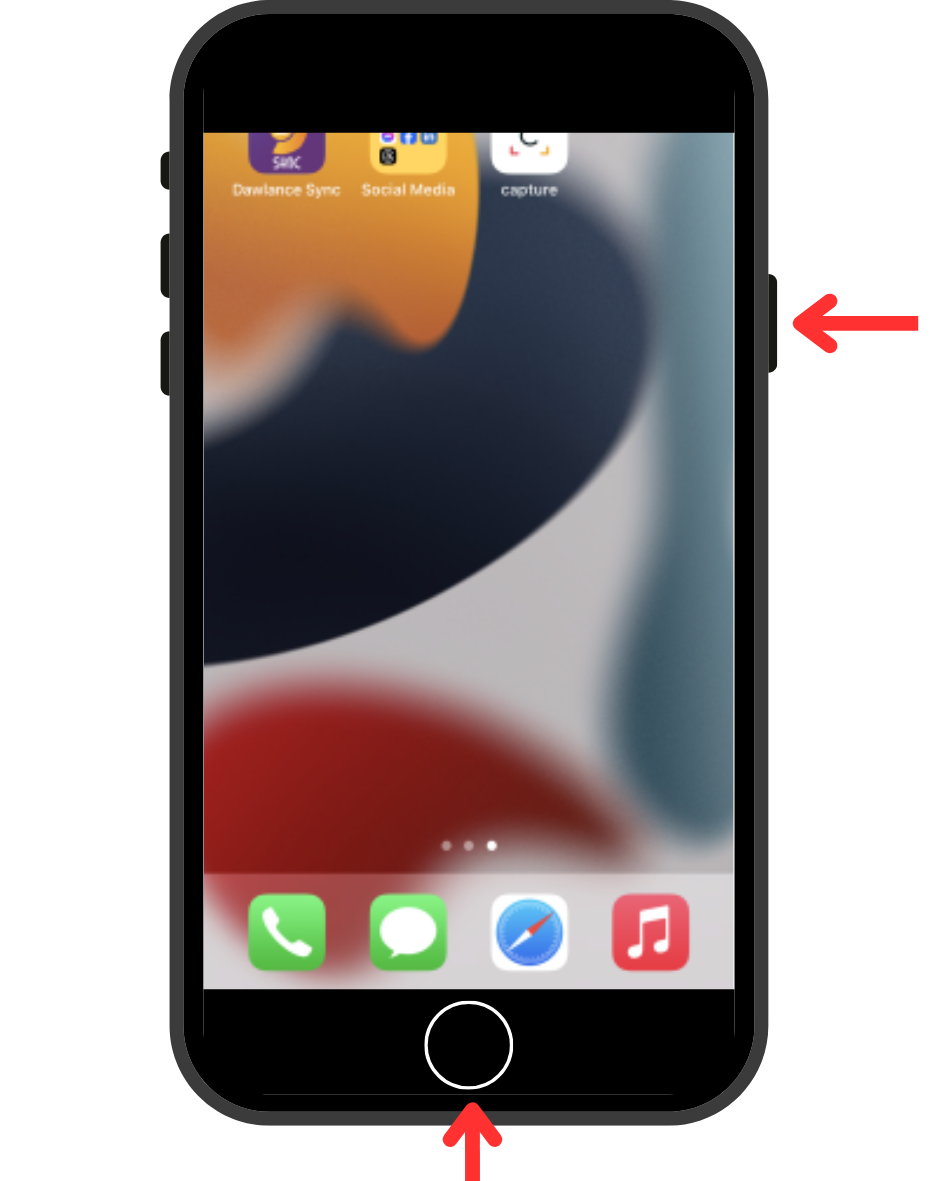
iPhone 7 has a Home button at the bottom center and a power button on the right panel. Each button has its own functions to perform within the iPhone, however, utilizing them in the below-described way will let us capture the screenshot.
- Go to that specific screen where the screenshot needs to be captured.
- Make the power button pressed with the Home button combined at the same instant.
- Tap on the small screen start appearing at the bottom left to edit the screenshot as shown below in the mentioned section.
This is the most aesthetic way to take screenshots on iPhone 7 (seven). We can also utilize the Assistive Touch for taking screen shorts. Let’s jump to the next method to enable it first.
Method 2: Using Assistive Touch to Take a Screenshot
Assistive Touch is an excellent feature of the iPhone that assists users when they have trouble performing different actions using their screen. “Assistive Touch” contains multiple options, such as locking the screen, finger gestures, and screenshots. By default, AssistiveTouch is not enabled in iPhone 7 or 7 Plus, we need to enable it manually.
Enable Assistive Touch on iPhone 7 / 7 Plus
We need to “enable AssistiveTouch” from the settings of the iPhone. To do so, follow the given steps.
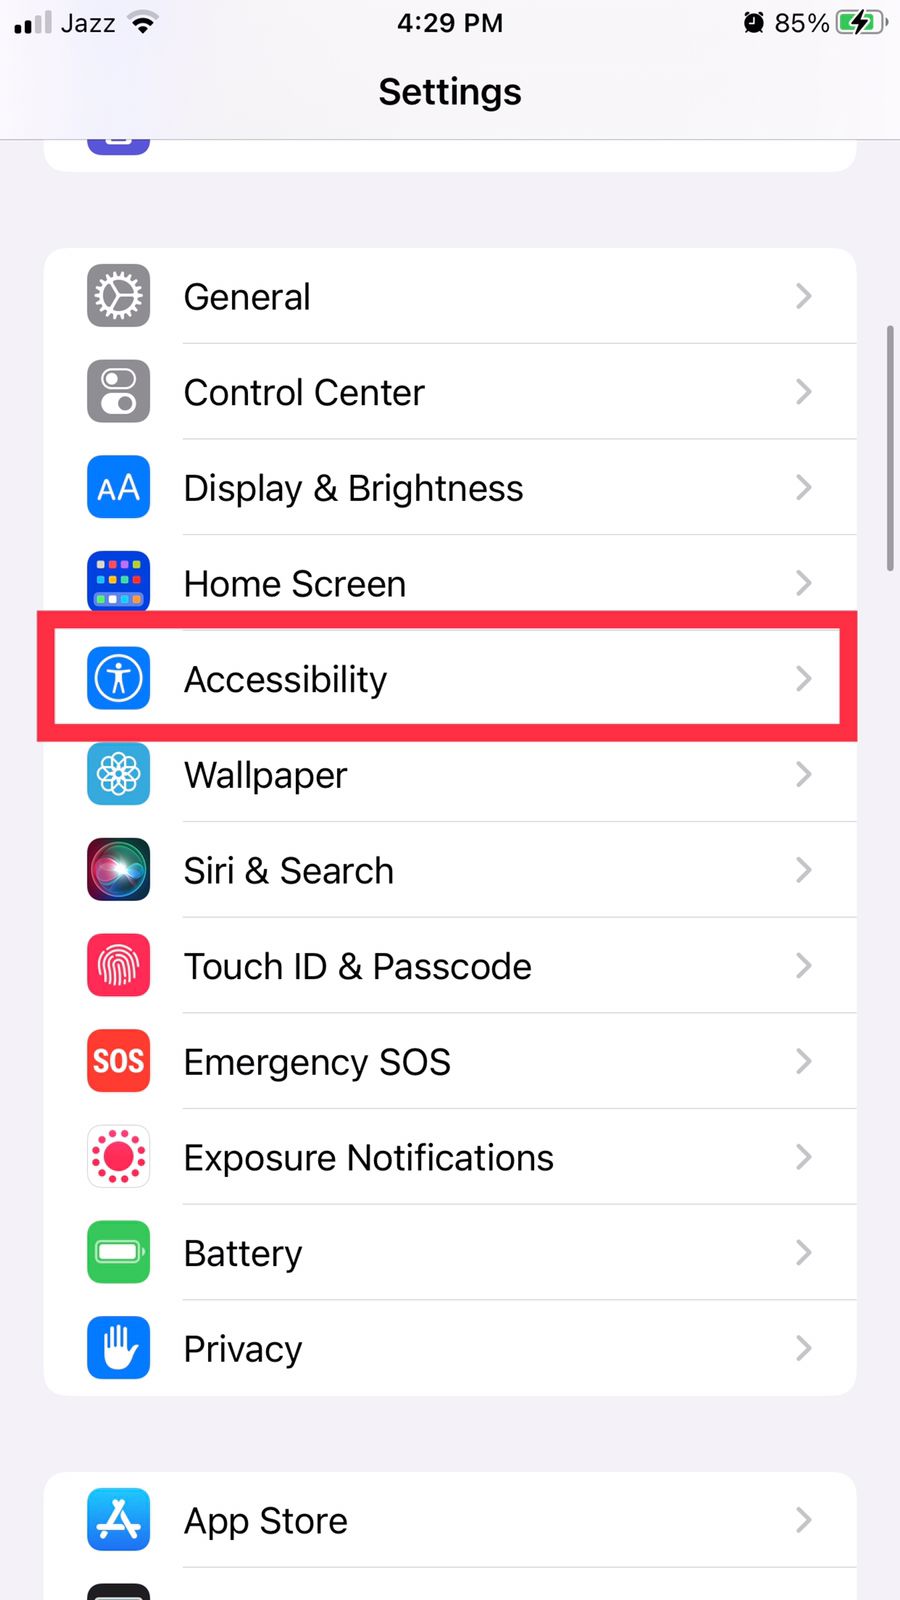
- Launch the “Settings” app from the iPhone and go to “Accessibility”.
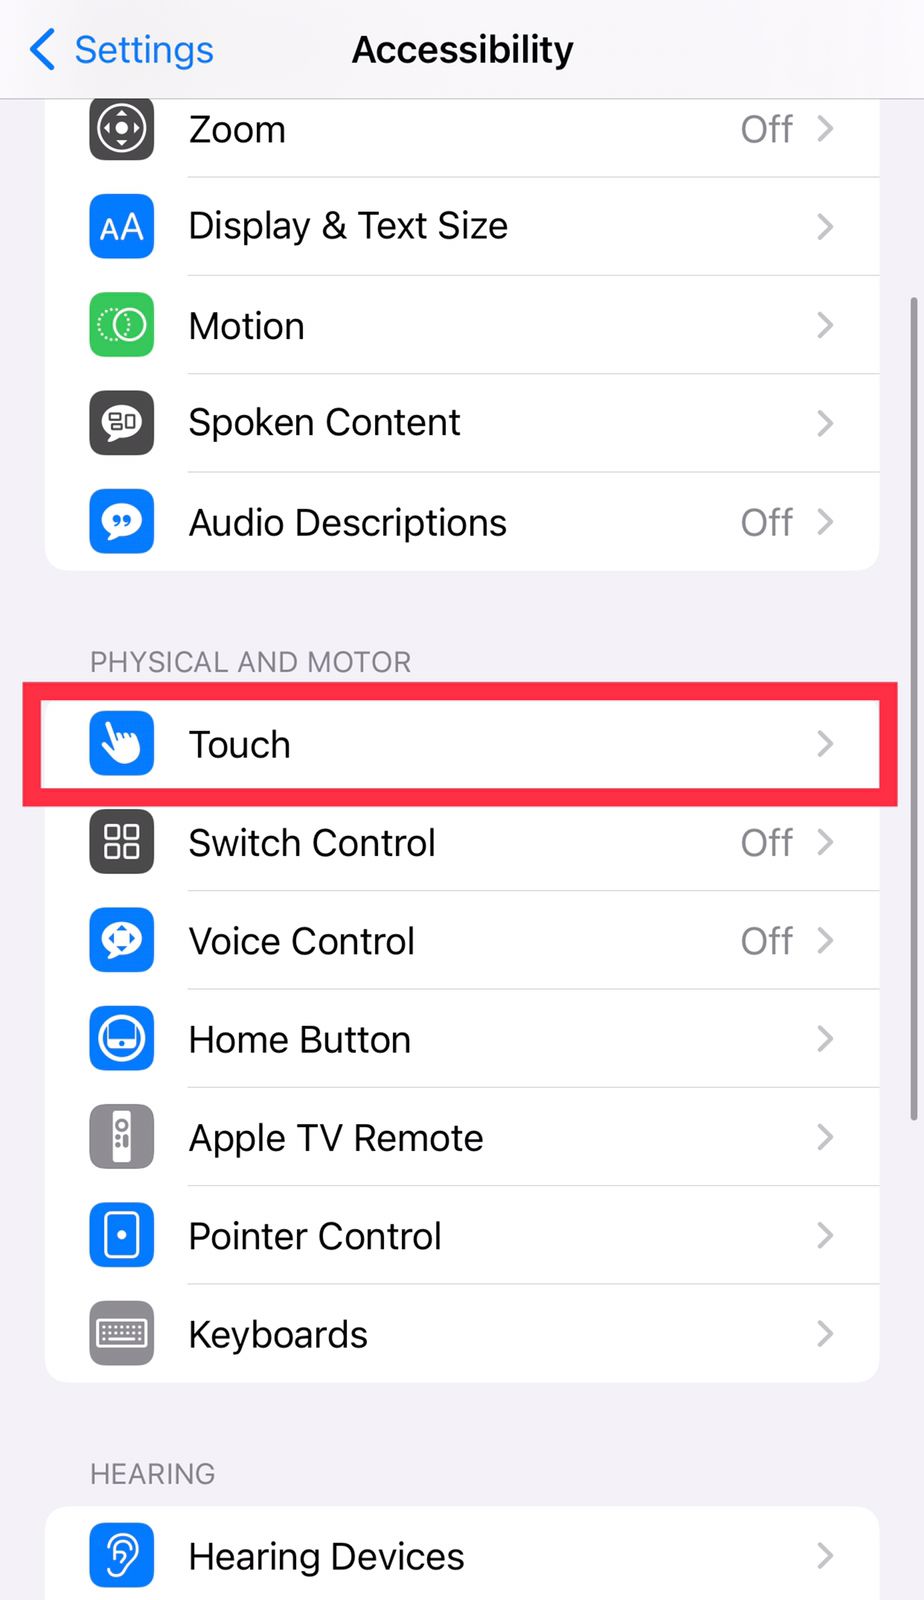
- Tap on the Touch” option can be found under the “Physical and Motor” section.
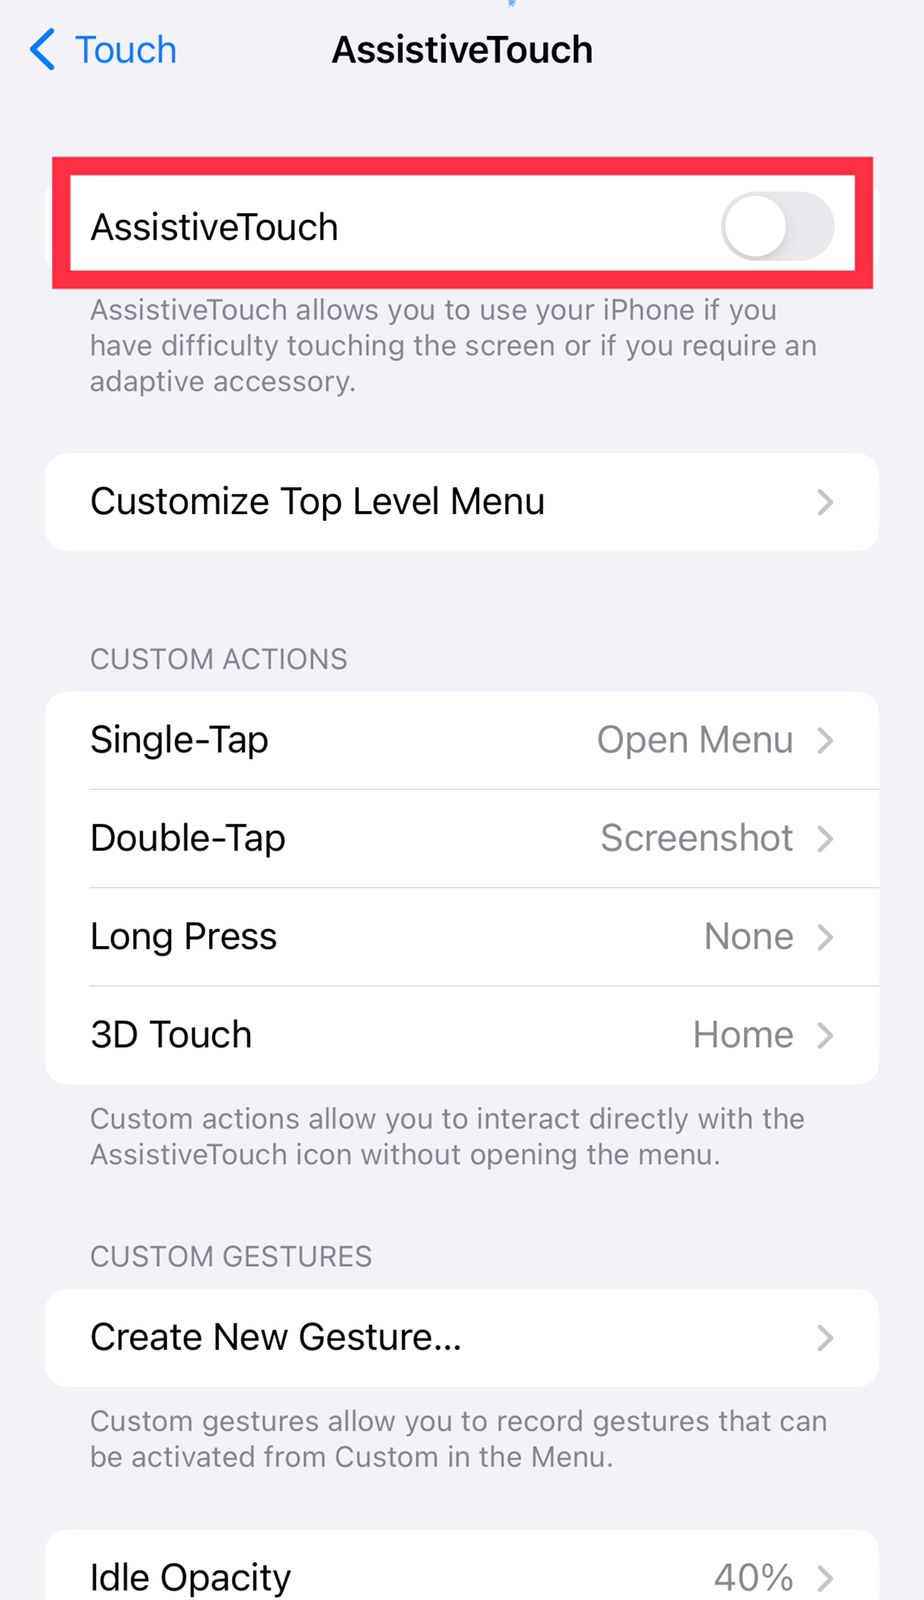
- On the top, the first option is “AssistiveTouch”; select this one.

- Here, we need to toggle it from left to right. It’ll turn green which means the AssistiveTouch option is now enabled in the iPhone.

Using Assistive Touch to Take Screenshot on iPhone 7 / 7 Plus
To utilize the Assistive Touch within iPhone 7 or seven Plus, follow the detailed steps listed below.
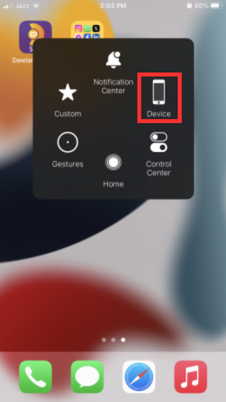
- Once the small white circle within a light black box (known as Assistive Touch) appears on the screen, tap on it.

- From the expanded menu, go to the Device option.
- There, three dots can be found above the More text, tapping on it will get the extra options for us.
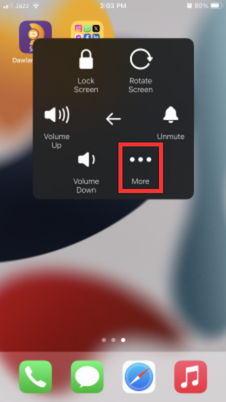
- Finally, hit the Screenshot option to capture the screenshot.

How to Access Your Screenshot
After taking the screenshots, we need to use them wherever they are needed. For that, we have to access the iPhone “Photos” app to access our screenshots. The Photos app can be found on the Home Screen. In case of not having the Photos app on the Home Screen, swipe down and a search bar will appear. Utilize the search bar by writing photos in it to find the Photos app on iPhone.

How to Fix Can’t Take Screenshots on iPhone 7 / 7 Plus
Generally, it is very rare that someone will not be able to take screenshots on an iPhone 7 device. However, there might be a chance that due to some bugs or glitches, the screenshot feature does not work properly. As a solution, restart the iPhone 7 to fix such a screenshot issue.
How to Instantly Edit and Share Screenshots
Sometimes while capturing a screenshot, a part of sensitive information also got captured. Thankfully, we can “edit screenshot” right after capturing it within the iPhone 7.
All we have to do is tap on the small window that appears for a few seconds right after taking the screenshot.

It will allow to edit that screenshot by providing multiple options, such as cropping, using pen tools, and inserting different shapes and text.

Use the color bar located in the bottom right to control colors and clicking on the plus button will provide the following option.
- Description: Give screenshots some description.
- Text: Add text over the screenshot
- Signature: Insert any kind of signatures
- Opacity: Control the screenshot transparency
- Magnifier: Zoom a certain part from the screenshot
- Shapes: Use circle, square, or arrow shapes

To share the screenshot, tap on the upward arrow icon located at the top right of the screen and choose the source from which the screenshot needs to be shared.
We have provided two efficient methods for making a screen capture on iPhone 7.
Conclusion
To capture a screenshot on iPhone 7, either utilize the power and home button combined at the same time or enable AssistiveTouch. Taking the screenshot with keys/buttons is easy; however, capturing the screen using AssistiveTouch is super easy if this option is enabled. To activate Assistive Touch, go to Settings>Touch>AssistiveTouch and toggle the option to on. After that, tap on the icon that appears on the screen known as Assistive Touch, and tap Device>More>Screenshot. This article has demonstrated all the possible ways to easily capture the iPhone 7 screen.


![[Infographic] The Definitive Guide to Identify Fake Airpods](https://appleonloop.com/wp-content/uploads/2020/12/Identify-Fake-Airpods-120x86.png)
